This exercise will help you apply the concepts from the lessons through a simple domain use case. It will take you from metamodeling to interpretation and compilation. It’s also excellent preparation for your graded lab sessions on the Robots project.
In this lab, you will model a Finite State Machine (FSM).
An FSM is a structure used to describe the behavior of a system based on states and transitions between those states.
Each machine contains a set of states, one initial state, and transitions triggered by events.
By the end of this lab, you will have:
- a machine (
FSM), - states (
State), - and transitions (
Transition).
Modeling a Finite State Machine (FSM) with Ecore
In this lab, you will model a Finite State Machine (FSM) using an Ecore metamodel.
Prerequisites
The modeling is made with Eclipse DSL 2025-09 with the added Ecore tools 4.0.
Ecore Metamodeling
Ecore is the core modeling language of the Eclipse Modeling Framework (EMF).
It is used to describe the structure of models, in other words, to define metamodels.
A metamodel specifies what concepts exist in a domain, what properties they have, and how they relate to each other.
Key Concepts
EPackage: A container that groups related model elements (similar to a namespace or a Java package). It has a name, a namespace prefix, and a URI that uniquely identifies it.
EClass: Represents a concept or type in the model (like a class in object-oriented programming). Each EClass can have:
- EAttributes (primitive features, such as strings or numbers)
- EReferences (links to other classes)
EAttribute: Defines a simple property of a class.
For example: FSM.name : EString means that each FSM has a string attribute called name.
EReference: Describes a relationship between classes. A reference can be:
- Containment: the target object belongs to the container (like composition in UML).
- Non-containment: a simple reference (like an association).
Opposite references: Two references can be declared as opposites to ensure consistency between both ends of a relation (e.g., Transition.src ↔ State.outgoing).
Multiplicity: Indicates how many elements can be linked (e.g., [0..*] for many, [1] for exactly one).
To start
Go to File > New > Ecore modeling project, name it fsm and open the model/fsm.ecore file.
You can edit it with Right click on the package fsm (generated when creating a Ecore project) > New Child > EClass | ....
You can do the same on an EClass: New Child > EAttribute | EReference | ... .
When selecting (double click on it) a node, you can edit its properties in a dedicated window.
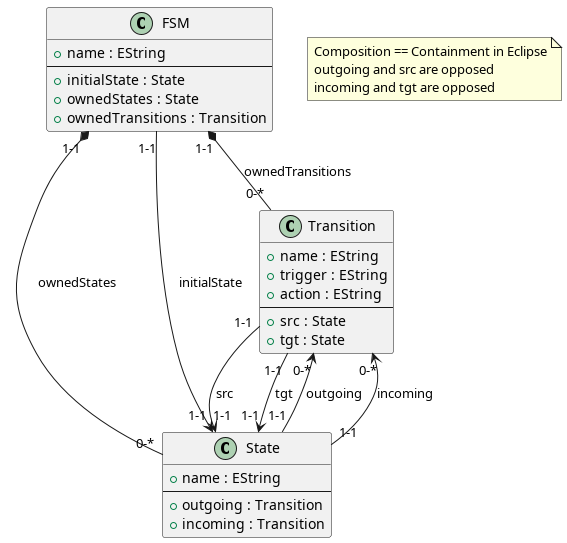
FSM Metamodeling
Model a Finite State Machine (FSM) using an Ecore metamodel. To help you, here is a class diagram illustrating what is expected:
Known issue
If you have any problem to create a ecore project in Eclipse, you should go to:
Help → Install New Software
In the window type:
Work with: 2025-03 - https://download.eclipse.org/releases/2025-03
Check the box Modeling, then click on Next → Next → Accept the conditions using the radio button → Finish
Restart Eclipse and you should have a new entry in the menu:
File → New → Other, type Ecore → Ecore Modeling Project
XText
In this exercise, you will design an Xtext grammar that defines a textual syntax for the FSM metamodel you created earlier in Ecore. Your goal is to allow users to describe finite state machines in a simple and readable DSL.
Objectives
- Understand how to map an Ecore metamodel to an Xtext grammar.
- Learn how to define rules for objects, attributes, and references.
- Write a concrete syntax that supports the creation of FSMs, States, and Transitions.
Context
You already have an Ecore metamodel describing:
A machine (FSM) containing:
- one optional initial state,
- a set of states (ownedStates),
- and a set of transitions (ownedTransitions).
A state (State) that can have incoming and outgoing transitions.
A transition (Transition) linking two states (src, tgt), with optional trigger and action.
Project
Create a new Xtext project: File → New → Project → Xtext Project.
- Project name:
fr.esir.ase.xtext.fsm - Language name:
xtext.Fsm. - Use the file extension:
fsm.
Define the grammar
Base it on the metamodel from the previous exercise. Make sure each FSM can contain states and transitions, and that these can refer to each other by name.
Use references ([Type|EString]) for links such as initialState, src, and tgt.
Your grammar should allow users to write files like this:
FSM MyFsm {
  initialState "S1"
  ownedStates {
    State "S1" { outgoing("t1") },
    State "S2" { incoming("t1") }
  }
  ownedTransitions {
    Transition "t1" src "S1" tgt "S2" trigger "go" action "doSomething"
  }
}
Check your grammar
Validate the grammar (no errors or warnings). Then, launch the Eclipse runtime by right-clicking on your xtext project, Run as → Eclipse Application.
In the new Eclipes runtime, aka modeling workbench, create a new project:
File → New → Project → Project. You can name it test-fsm.
In this project, create new .fsm file:
File → New → File, and name it test.fsm: Mind to type the extension, which will let your Eclipse recognize the file as a file of your fsm language.
Use content assist (Ctrl+Space) to verify that names and references are correctly resolved and check if the IDE reports any syntaxique errors, by writing wrong token such as Sate instead of State.
You can also open your .fsm file with the FSM Model Editor by Right Click on a .fsm → Open with → Fsm Model Editor. You will see your program as EMF models.
Generate an Xtext grammar from ecore
Eclipse allows you to create a Xtext project based on a ecore:
File → New → Project → Type xtext → Xtext Project From Existing Ecore Models
You can check and compare the generated grammar with yours.
Langium
If not done already, you will need to install a node environment as well as Visual Studio Code, and then run the command:
npm i -g yo@5.1.0 generator-langium@3.3.0`
to install the Langium project generator. Then, run:
yo langium
to generate the project. This will offer to create a few different things; you have to say yes to all of them BUT CLI, pick a language name, extension name, and a file extension (e.g. .fsm). You can also install the Langium extension from the VSCode marketplace, to have syntax highlighting and validation in your grammar.
We use a particular version of yo and generator-langium in these labs due to the rapid change in the version of Langium. Make sure that you use these versions.
Xtext to Langium
Fortunately, it is possible to convert an Xtext grammar into a Langium grammar thanks to this project.
To convert a grammar, go to the Eclipse menu Help -> Install new software -> in the site field, paste the URL https://typefox.github.io/xtext2langium/download/updates/v0.4.0/ and install the package. Afterwards, go into your Xtext project’s META-INF/MANIFEST.MF, switch to the Dependencies tab, and in the Required Plug-ins section add Xtext2langium as a dependency. Don’t forget to save your manifest file. Then you can go to the MWE2 file (named something like GenerateMyDsl.mwe2) in your project, and add to language, the following fragment:
language {
    ...
    fragment = io.typefox.xtext2langium.Xtext2LangiumFragment {
        outputPath = './langium'
    }
}
Right-click the MWE2 file and run it. You should see a langium folder appear in your project, with corresponding .langium grammar files which you can put into your src/language/ folder of the Langium project in VSCode.
Make sure the grammars names match up between your projects, otherwise you will have to manually refactor the conflicts.
Langium Build
Once copied and adjusted, run in the Langium project, :
npm install
npm run langium:generate
npm run build
Hit F5 in VS Code to run the extension. A new VSCode will popup: the modeling workbench. In this new VSCode, create a file with the correct extension and test your grammar.
File example:
FSM DoorSystem {
    initialState Closed

    ownedStates {
        State Closed {
            outgoing(open)
            incoming(close)
        },
        State Open {
            outgoing(close)
            incoming(open)
        }
    }

    ownedTransitions {
        Transition open {
            trigger "open"
            action "open door"
            src Closed
            tgt Open
        },
        Transition close {
            trigger "close"
            action "close door"
            src Open
            tgt Closed
        }
    }
}
Interpretation with Langium
In this part, you will develop an interpreter for your FSM language.
The interpreter allows you to simulate the behavior of an FSM by evolving a runtime state.
Goal
The interpreter algorithm should:
- Load an FSM model from an .fsm file.
- Start from the machine’s initial state.
- Select one of the outgoing transitions (for example, randomly).
- Apply its trigger and action, and move to the target state.
- Continue until a state with no outgoing transitions is reached (terminal state) or a given number (e.g. 10) of transitions has been executed.
The execution should produce trace messages in the console (console.log('...')) to show the evolution of the system.
Add a file interpreter.ts in language:
import { Reference } from 'langium';
import type { FSM, State, Transition } from './generated/ast.js';

export class FsmInterpreter {
    public run(fsm: FSM): void {
		const ctx = new FsmContext(fsm.initialState.ref);
        /* FSM interpreter algorithm goes there */
	}
}

export class FsmContext {
    currentState: State;

    constructor(initialState: State) {
        this.currentState = initialState;
    }
}
In index.ts, add export * from './interpreter.js'
Note: Yes, it a .js while we just created a .ts.
When writing a TypeScript library, such as fsm-language, we compile the .ts files into .js files to the folder out/.
But in the source code (.ts), we need to add the imports as they were compiled (.js), because:
- TypeScript in ESM do not rewrite file extensions
.ts→.jsautomatically. - VSCode + Node in ESM requires the paths to the
.js.
Runner
Now, we want a VSCode action, a kind of plugin that execute a command to launch the interpretation.
In extension, a new folder runner, add a new file runner.ts with the following code:
import { FSM, createFsmServices, FsmInterpreter } from 'fsm-language';
import { NodeFileSystem } from 'langium/node';
import * as vscode from 'vscode';

export async function runFsmFile(textDocument: vscode.TextDocument) {
    const services = createFsmServices({ ...NodeFileSystem });
    const document = services.shared.workspace.LangiumDocumentFactory.fromString(textDocument.getText(), textDocument.uri);
    await services.shared.workspace.DocumentBuilder.build([document], { validation: true });
    const root = document.parseResult.value;
    const fsm = root as FSM;

    if (!fsm) {
        vscode.window.showErrorMessage(`Parsing failed: ${document.diagnostics}`);
        process.exit(1);
    }

    vscode.window.showInformationMessage('FSM loaded successfully');

    const interpreter = new FsmInterpreter(fsm);
    interpreter.run(fsm);
}
Then, add in main.ts from extension:
export async function activate(context: vscode.ExtensionContext): Promise<void> {
    client = await startLanguageClient(context);
    context.subscriptions.push(
        vscode.commands.registerCommand('fsm.runFsm', () => {
            const editor = vscode.window.activeTextEditor;
            if (editor) {
                runFsmFile(editor.document);
            }
        })
    );
}
And add in package.json:
"contributes": {
    /* ... */
        "commands": [
            {
              "command": "fsm.runFsm",
              "title": "Run FSM"
            },
        ]
    },
    /* ... */
    "activationEvents": [
        "onLanguage:fsm",
        "onCommand:fsm.runFsm",
    ],
    /* ... */
Build and Run
To test, open a terminal, go to extension folder and run npm run build.
In VSCode, press F5 to launch a new VSCode with our extensions.
In this new VSCode, :
- Open a
.fsmfile Ctrl+Shift+P, then type:> Run FSM- You should see in the console of the VSCode containing the interpreter (language workbench), the traces of your
console.log().
Compilation with Langium
In this part, you will implement a compiler for your FSM language. The compiler will translate a textual FSM model into a TypeScript implementation that can be executed independently. Unlike the interpreter (which executes the model directly), the compiler generates TypeScript code.
Goal
Your compiler should:
- Generate TypeScript files representing the FSM structure (machine, states, transitions).
- Implement a runtime behavior that can execute transitions and evolve between states.
- Produce files that can be executed as a standalone program.
This process illustrates the Visitor pattern, as your compiler must traverse the model and produce corresponding code elements.
With all the knowledge accumulated, you should be able to implement this compiler by yourself, in particular, based on what we did for the intrepreter.
Do not forget to:
- Update the
main.tsfromextension - Update the
package.json - Run
npm run buildin theextension
Solutions
Intepreter
import { Reference } from 'langium';
import type { FSM, State, Transition } from './generated/ast.js';

export class FsmInterpreter {
    private random: () => number;

    constructor() {
        this.random = () => Math.random();
    }

    // Main algoritm of the interpreter
    public run(fsm: FSM): void {
        // Potentially, the initially is not provided, therefore we return
        if (!fsm.initialState?.ref) {
            console.log(`FSM '${fsm.name}' has no initial state.`);
            return;
        }

        // Initialization of the runtime state of the interpreter
        const ctx = new FsmContext(fsm.initialState.ref);
        console.log(`Starting FSM: ${fsm.name}`);
        console.log(`Initial state: ${ctx.currentState.name}`);

        // Main loop - until we reach a terminal state or 10 transitions have been taken
        let count = 10;
        while (count-- > 0) {
            // Retrieve all the outgoing transitions from the current state
            const transitions = this.getOutgoingTransitions(ctx.currentState);

            // if none, i.e. transitions[] is empty, we reach a terminal state, therefore we break
            if (transitions.length === 0) {
                console.log(`Reached terminal state: ${ctx.currentState.name}`);
                break;
            }

            // We pick a random transition, and interpret it
            const pickedTransition = this.pickRandomTransition(transitions);
            this.interpretTransition(pickedTransition, ctx);
        }
    }

    // Interpretating a transition means to print trigger and action, and update the current state
    private interpretTransition(t: Transition, ctx: FsmContext): void {
        console.log(`--- Executing transition: ${t.name}`);
        if (t.trigger) console.log(`Trigger: ${t.trigger}`);
        if (t.action) console.log(`Action: ${t.action}`);

        if (t.tgt?.ref) {
            ctx.currentState = t.tgt.ref;
            console.log(`Now in state: ${ctx.currentState.name}`);
        } else {
            console.log(`Transition '${t.name}' has no target; stopping.`);
        }
    }

    private pickRandomTransition(transitions: Transition[]): Transition {
        const i = Math.floor(this.random() * transitions.length);
        return transitions[i];
    }

    private getOutgoingTransitions(state: State): Transition[] {
        // in Langium, cross references are usually stored as { ref: <object> }
        return (state.outgoing ?? []).map(ref => ref.ref).filter((t): t is Transition => !!t);
    }
}

export class FsmContext {
    currentState: State;

    constructor(initialState: State) {
        this.currentState = initialState;
    }
}
Compiler
import fs from 'node:fs';
import path from 'node:path';
import { CompositeGeneratorNode, NL, toString } from 'langium/generate';
import type { FSM, State, Transition } from './generated/ast.js';

/**
 * A visitor-like compiler for FSM models, generating JavaScript code
 * that mirrors the Java generator implemented in Xtend.
 */
export class FsmCompiler {

    constructor(private readonly destination: string) {}

    public compile(fsm: FSM): void {
        const pkg = 'fsm.generated';
        const outDir = path.join(this.destination, pkg.replace(/\./g, '/'));
        fs.mkdirSync(outDir, { recursive: true });

        this.generateStateInterface(pkg, outDir);
        this.generateContext(pkg, outDir);
        this.generateStates(pkg, fsm, outDir);
        this.generateMain(pkg, fsm, outDir);

        const absoluteOutDir = path.resolve(outDir);
        console.log(`✅ FSM '${fsm.name}' compiled to ${absoluteOutDir}`);
    }

    private generateStateInterface(pkg: string, outDir: string): void {
        const node = new CompositeGeneratorNode();
        node.append(`// Auto-generated FSM State interface`, NL);
        node.append(`import { FsmContext } from './FsmContext';`, NL);
        node.append(`export interface State {`, NL);
        node.indent(s => {
            s.append(`onEnter(ctx: FsmContext): State | undefined;`, NL);
        });
        node.append(`}`, NL);
        this.writeFile(outDir, 'State.ts', toString(node));
    }

    private generateContext(pkg: string, outDir: string): void {
        const node = new CompositeGeneratorNode();
        node.append(`// Auto-generated FSM Context`, NL);
        node.append(`import type { State } from './State';`, NL, NL);
        node.append(`export class FsmContext {`, NL);
        node.indent(s => {
            s.append(`private current: State | undefined;`, NL, NL);
            s.append(`setState(s: State) { this.current = s; }`, NL);
            s.append(`getState(): State | undefined { return this.current; }`, NL);
            s.append(`start() {`, NL);
            s.indent(b => {
                b.append('if (!this.current) {', NL);
                b.indent(c => {
                    b.append(`console.error('No initial state defined.');`, NL);
                    b.append(`return;`, NL);
                })
                b.append('}', NL, NL);

                b.append(`let count = 10;`, NL)
                b.append(`while(count-- > 0) {`, NL);
                b.indent(c => {
                    c.append(`const nextState = this.current.onEnter(this);`, NL);
                    c.append(`if (!nextState) { return; }`, NL);
                    c.append(`this.setState(nextState);`, NL)
                    c.append(`console.log('nb transitions remaining:', count);`, NL);
                });
                b.append('}', NL);
            });
            s.append('}', NL);
        });
        node.append(`}`, NL);
        this.writeFile(outDir, 'FsmContext.ts', toString(node));
    }

    private generateStates(pkg: string, fsm: FSM, outDir: string): void {
        for (const s of fsm.ownedStates) {
            this.generateStateClass(pkg, fsm, s, outDir);
        }
    }

    private generateMain(pkg: string, fsm: FSM, outDir: string): void {
        const node = new CompositeGeneratorNode();
        node.append(`// Auto-generated entry point`, NL);
        node.append(`import { FsmContext } from './FsmContext';`, NL);
        for (const s of fsm.ownedStates) {
            node.append(`import { ${s.name} } from './${s.name}';`, NL);
        }
        node.append(NL);
        node.append(`export class ${fsm.name}Main {`, NL);
        node.indent(s => {
            s.append(`static main() {`, NL);
            s.indent(b => {
                b.append(`const ctx = new FsmContext();`, NL);
                const init = fsm.initialState?.ref?.name ?? fsm.ownedStates?.[0]?.name ?? 'undefined';
                if (init !== 'undefined') {
                    b.append(`ctx.setState(new ${init}());`, NL);
                    b.append(`ctx.start();`, NL);
                } else {
                    b.append(`console.error('No initial state defined.');`, NL);
                }
            });
            s.append(`}`, NL);
        });
        node.append(`}`, NL);
        node.append(`${fsm.name}Main.main()`, NL);
        this.writeFile(outDir, `${fsm.name}Main.ts`, toString(node));
    }

    private generateStateClass(pkg: string, fsm: FSM, s: State, outDir: string): void {
        const node = new CompositeGeneratorNode();
        node.append(`// Auto-generated class for state ${s.name}`, NL);
        node.append(`import { randomInt } from 'crypto';`, NL);
        node.append(`import { State } from './State';`, NL);
        node.append(`import { FsmContext } from './FsmContext';`, NL);
        const outgoing = (s.outgoing ?? []).map(ref => ref.ref).filter((t): t is Transition => !!t);
        outgoing.forEach((t, i) => {
            const tgt = t.tgt?.ref?.name ?? 'undefined';
            if (tgt) {
                node.append(`import { ${tgt} } from './${tgt}';`, NL);
            }
        });
        node.append(NL);

        node.append(`export class ${s.name} implements State {`, NL);
        node.indent(b => {
            b.append(`onEnter(ctx: FsmContext): State | undefined {`, NL);
            b.indent(body => {
                if (outgoing.length === 0) {
                    body.append(`console.log("Reached terminal state: ${s.name}");`, NL);
                } else {
                    body.append(`console.log("Entering state: ${s.name}");`, NL);
                    body.append(`const choice = randomInt(0, ${outgoing.length});`, NL);
                    body.append(`switch (choice) {`, NL);

                    outgoing.forEach((t, i) => {
                        const tgt = t.tgt?.ref?.name ?? 'undefined';
                        const trigger = t.trigger ?? '';
                        const action = t.action ?? '';
                        body.indent(sw => {
                            sw.append(`case ${i}:`, NL);
                            sw.indent(caseBody => {
                                caseBody.append(`console.log("Transition: ${t.name} trigger: ${trigger} action: ${action}");`, NL);
                                caseBody.append(`return new ${tgt}();`, NL);
                            });
                        });
                    });
                    body.indent(sw => {
                        sw.append('default:', NL);
                        sw.indent(defaultCase => defaultCase.append('return undefined;', NL));
                    });
                    body.append(`}`, NL);
                }
            });
            b.append(`}`, NL);
        });
        node.append(`}`, NL);

        this.writeFile(outDir, `${s.name}.ts`, toString(node));
    }

    private writeFile(outDir: string, fileName: string, content: string): void {
        const filePath = path.join(outDir, fileName);
        fs.writeFileSync(filePath, content);
    }
}
Compile action
Now, we want a VSCode action, a kind of plugin that execute a command to launch the compilation.
In extension, a new folder compiler, add a new file compiler.ts with the following code:
import path from "path";
import { FSM, createFsmServices, FsmCompiler } from 'fsm-language';
import { NodeFileSystem } from 'langium/node';
import * as vscode from 'vscode';

export async function compileFsmFile(textDocument: vscode.TextDocument) {
    const services = createFsmServices(NodeFileSystem);
    const document = services.shared.workspace.LangiumDocumentFactory.fromString(
        textDocument.getText(),
        textDocument.uri
    );

    await services.shared.workspace.DocumentBuilder.build([document], { validation: true });

    const root = document.parseResult.value;
    const fsm = root as FSM;
    if (!fsm) {
        vscode.window.showErrorMessage(`Parsing failed: ${document.diagnostics}`);
        return;
    }

    const destinationFolder = path.dirname(textDocument.fileName);
    const compiler = new FsmCompiler(destinationFolder);
    compiler.compile(fsm);

    vscode.window.showInformationMessage(`FSM '${fsm.name}' compiled successfully.`);
}
Then, add in main.ts from extension:
export async function activate(context: vscode.ExtensionContext): Promise<void> {
    client = await startLanguageClient(context);
    context.subscriptions.push(
        vscode.commands.registerCommand('fsm.runFsm', () => {
            const editor = vscode.window.activeTextEditor;
            if (editor) {
                runFsmFile(editor.document);
            }
        })
    );
    context.subscriptions.push(
        vscode.commands.registerCommand('fsm.compileFsm', () => {
            const editor = vscode.window.activeTextEditor;
            if (editor) {
                compileFsmFile(editor.document);
            }
        })
    );
}
And add in package.json:
"contributes": {
    /* ... */
        "commands": [
            {
              "command": "fsm.runFsm",
              "title": "Run FSM"
            },
            {
                "command": "fsm.compileFsm",
                "title": "Compile FSM"
            }
        ]
    },
    /* ... */
    "activationEvents": [
        "onLanguage:fsm",
        "onCommand:fsm.runFsm",
        "onCommand:fsm.compileFsm"
    ],
    /* ... */
Build and Run
To test, open a terminal, go to extension folder and run npm run build.
In VSCode, press F5 to launch a new VSCode with our extensions.
In this new VSCode, :
- Open a
.fsmfile Ctrl+Shift+P, then type:> Compile FSM- A new folder is generated:
fsm/generatedwith a bunch of file. - In terminal, go to the
fsm/generatedfolder and run, replacing theXXXby the correct name:
npx ts-node --compiler-options '{"module":"CommonJS"}' XXXMain.ts
If needed, install ts-node:
npm install -D ts-node typescript